Wednesday 17 December 2014

My Recreation of Zac Possen SS15 Make up


For my final assessment I decided to recreate the make up and hair from Zac Possen's SS15 campaign. Heres how it went. 

I prepped my station with all the products I needed. I washed my hands and sanitised and then gowned my model bringing the chair up to the highest possible point so that I could stand in a comfortable position without bending over too much. My model had recently been ill and so had some really dry areas on her skin because of this I used a lot of moisturiser to prep the skin. This was also necessary because I wanted to create a really dewey look and that was not possible without using moisturiser first. To add to the bright and dewey look I also used Marks and Spencer's Illuminating Primer from the Autograph range. 

I applied Mac Studio Fix foundation to the face starting from the centre and working my way out wards. I used a flat blending brush to really work the make up into the skin. To perfect the skin I concealed dark areas using my pink toned Mac concealer. Once I had finished I powdered the centre of the face only to create a matt texture on the T zone area with a contrasting Dewey texture around the sides of the face. As I went on with the make up I did go back to the sides of the face to apply a little more foundation to add to the dewey texture that had toned down a little. 

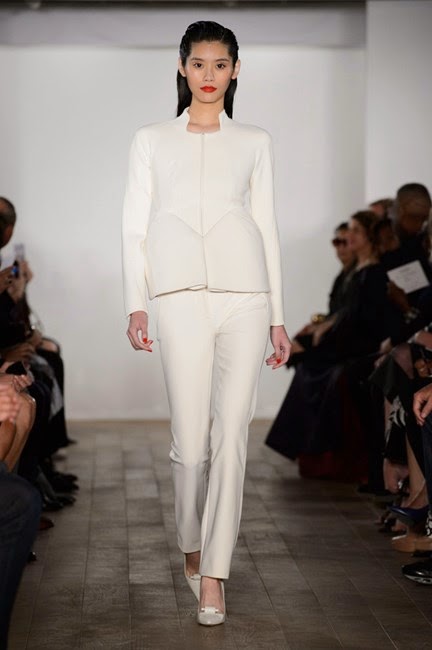
I then went on with contouring the cheeks for which I used just a tiny amount of Mac bronzing powder. Originally this was not in my preparation however I added this because I felt the blush on its own did not define the face enough and on looking closer at the images I noticed that there was some contour that had been given to a majority of the models on the Zac Possen show. Once I had finished this I worked in the blusher onto the skin using Mac Blush Baby to highlight the cheeks. This made the look start to come together because the blusher is a key element to this look. 

I applied a goldy orange tone eye shadow to the eyes from MUA collection from super drug. It was the closest match I could find to the one used on the Zac Possen show. And actually the match was pretty perfect, I applied this to the eyes but I did not go over with Vaseline to add texture to the eyes until the end this was to avoid the crease lines appearing. I think this step should be done just before the model walks the cat walk so that it stays perfected. 

When It came to creating the lip I wanted to create a deep red but not one with a pink tone like the ones I had I needed to create one with a bold orange tone to it. To achieve this I filled in the lips with Mac lip pencil in Cherry red. This helped build texture to the lips. Over the top I combined Kryolan Orange greasepaint with a little Mac Ruby woo. This really made the perfect colour I was looking for an gave the lips a bold edge. I think working with the pencil over the entire lips and the lip colour over the top really helped to create a graphic and bright lip colour that stands out the way it does in the Zac Possen show. 

Most of the eyebrows in the show were pretty natural with some definition added. To achieve this look I set the eye brows using brow gel and applied eye shadow to the hairs coating them with colour to add some depth but not to change the shape or add any colour to the skin. I think this was very alike to my Visuals and was picked up on during my feedback which I was really pleased about. 

Overall I am really happy with the outcome, despite making some last minute changes I completed everything in time and was extremely happy and relieved with the outcome. 


Tuesday 9 December 2014

Crimping

1
3
2

In todays lesson we practised crimping in a range of different techniques I decided to go for the technique using a pin. I liked this style because it creates a really afro texture. I wrapped the hair in a figure of eight around the pin pushing it up as I went along. To keep it in place I went over the hair with a straightener. This way is very time consuming and so in a shoot environment a heated crimper may be more suitable. 


Odile Gilbert - Hair Stylist


Odiles is a very well known french hair stylist who's name pops up often when discussing cat walk shows and editorial campaigns. 
Her career begun in the 70s, after graduating from Hair School in Brittany France she moved to Paris were she assisted the famous hair stylist Bruno Pittini. This allowed her to gain experience working alongside celebrities in fashion shows and photo shoots. 

In the 80's Odile moved from Paris to New York were she started working on fashion and beauty editorials. Since then Odile Gilbert has been an extremely prominent hair stylist styling for very big campaigns for the likes of Lancome, Balenciaga, H&M, Karl Largafield and many more. She has also styled for a huge number of magazine covers such as Vogue, as well as leading the hair creations behind cat walk shows from Tom Ford, Zac Posen, Suno, Thakoon among many others. Her celebrity clients include Cate Blanchette, Penelope Cruz, Kiera Knightly and Kristien Stewart just to name a few. 

'Odile is really well known for creating naturally tousled looks, although she's regularly called upon to create more Avant Gard stylised looks'1

Im a big fan of Odiles work because she seems to have an explanation behind every style she creates. When reviewing some of her looks she always had a story behind them all. This really helps in sharing her vision so that we look at the hair and understand it. For me this also draws more emotion too. For example with the Zac Posen SS15 she created a look that represents a strong and independent women she described the wet look as a women exiting a swimming pool. I think that using this analogy of a women exiting a pool really does represent strength but this is not something you would associate it with, in this way Odiles creativity really pays off. 


I think Odile as a designer is very diverse. In some cases its more of an Art form then a hair style. For me one of her most defining moments was when she created a hat out of human hair for Jean Paul Gartier. I think this really portrays her artistic and creative vision through her work. This is very inspiring seeing a stylist embrace such an un conventional way of hair styling. 


Bibliography 
1.http://www.odilegilbertcreations.com/bio_en
http://www.businessoffashion.com/odile-gilbert
http://models.com/people/odile-gilbert
http://www.losthairdressers.com/artist-info-odile-gilbert

Monday 8 December 2014

Ombre Lips & Glitter Lips


Step One
Today we created some really cool glitter lips, When I got home I practised creating my own. To begin after sanitising my hands I applied black track from Mac to the back of my hand, This product dries really quickly so I closed the lip straight away. I then applied the black track with a clean brush onto my lips filling in the natural shape. The glitter that I used is loose glitter which of course needs something to stick to so using the same brush that I used to apply the black track I applied a small amount of vasaline on top of the black track. When this was done using a clean brush I patted on glitter onto my lips, On this occasion I used two different coloured glitters to create a nice effect, I used a darker purple on the lips apart from the centre, Then I applied a lighter silver and purple mix on the centre of the lip to create a kind of ombre effect as we had been practising ombre lips today and wanted to see how it would work with glitter! To clean up the glitter around my face I used masking tape patting it on to the skin around the lips pulling off any excess glitter this also helped me to keep the edges tidy. If I was to do this on a shoot or film environment for this reason I would make sure I do the glitter lips first! 

Some problems I faced when looking at the final image was that there is still a black line visible around some of the edges next time I will spend more time cleaning the outside edges with a cotton bud to remove the black line. I also I could have been bolder with the ombre effect as its not very clear. 


Ombre Lips
In our workshop we worked on creating ombre lips. I struggled with this greatly when working on my model for a number of reasons. On my model I applied a dark vampy red lip colour from my Kryolan Lip pallet, The lip colour I used was very glossy and because of this I struggle a lot when it came to blending, Once I applied the colour I lined the lips with Mac black eyeliner. This I did struggle with because of the size of my models lips I found that they were quite small and the lip line wasn't definite so I really had to be careful I was sticking to the natural shape if the lips. I also struggled with the black because with it being so dark and such a soft pencil it was very easy to make a error or a smudge so I really tried to keep my hand steady by leaning on my model gently and holding her head underneath her chin to keep her in a still position. Once I had applied the black liner I used a concealer brush drag the darker colour into the lip colour to create the ombre effect. I used a concealer brush because they are firmer and are better at dragging pencils into place. 
When I was lining the lips I asked my model to open her mouth so that I could line the corners properly as shown in the picture below. Where there was some errors to the lining I used a cotton bud and toner to remove them. I felt like I wasn't completely happy with the final outcome of my ombre lips. I think using such a glossy lipstick made it a lot harder for me to get that definite blend into to colours making it at one point look like the entire lips were black. To get it back to ombre I had to apply some more of the dark red lip colour onto the centre of the lips. 

2.
1.


3.
4.


Because I wasn't happy with the outcome in the workshop I felt like I needed more practise so I went home to practise on my self with different products using lipsticks with a matte texture not a glossy. I was a lot happier with this outcome and felt the ombre effect was a lot clearer. I used the same brushes and application technique. 

Please Play the video to see how I created Ombre Lips on myself 


Charlotte Tilbury


Charlotte Tilbury is a favourite of mine because for the past few years I have followed here closely learning a great deal from her online posts. She shares with us how to create looks she has used on the catwalk and in shoots. 

Charlotte tilbury is a London born artist, Her farther was an artist and she describes in her up brining in her bio ‘ A creative melting pot of artists, writers, hippies and the club scene’1 
This would be the starting point and influence from Tilbury’s vast imagination and artistic eye. Which I feel is with her in every look she creates. Charlotte also grew up in Ibiza up until the age of  9 years old2 before moving to England with her parents it was then she had her first had her contact with make up, since then make up has ‘changed herLIFE’ 3

Charlotte was educated at Glauca Rossi School of Make-Up,4 were she was introduced to the industry to a high standard. Mary Greenwell who Charlotte assisted for was who encouraged her to choose this as a place of study. 

Since then charlotte has a long list of clients contributing covers and editorials to Vogue in British,Spanish,Brazil and France5 Aswell as regularly directing make up for shows such as the recent Tom Ford AW14 which I have reviewed in my blog. She's also directed make up for clients as big as ‘ Stella McCartney, Hakaan, Burberry and Donna Karen’6 


I recently went to the launch of Charlotte Tilbury’s Backstage Beauty Booth at Fenwick on Bond Street. I also saw Lindsey Lohan who is a frequent client of Tilburys as well as Made in Chelsea's Milly McKintosh which was great. 


Face Charts!


 I have had lots of fun lately creating some weird and exciting face charts thanks to Branka showing us her way of creating face charts. Face charts are really important and its something I want to be able to perfect as I think its really professional turning up to a job with the ability to give others a visual of your thoughts. This is a great way of communicating your idea especially with those who will not see it as you may be describing. 


Sunday 7 December 2014

B.Balenciaga Vogue November issue

Vogue November Issue 
Vogue November Issue


I really liked the fragrance campaign for B. Balenciaga with Anna Ewers. I really like the winged eye liner, it covers almost the entire lid of the eye giving her a really sultry look. The rest of the face is really clear and tonal with the rest of the photograph the editing has been done really effectively. Her eye brows are really defining without being filled in too much, they frame the frame really nicely. I think this make up look goes perfectly with a middle parting and slicked back hair. The thing about this campaign is the final image looks really different to the actual make up look in terms of texture. Its as if the editing has given the make up look a really matte texture however in real life the look was very illuminating and radiant with a moisturised plump and dewey look. 

If I was to re create this look I would use plenty of moisturiser on the skin to give a fresh and  healthy look. To replicate this foundation look I would use an illuminating moisturiser with good coverage. When looking at the final image of the campaign the make up coverage looks a lot lighter then to the behind the scenes photo that hasn't been edited. A foundation I would use to get this type of coverage would be Mac Studio Fix Foundation. I would use this because it gives lovely even coverage and without powdering can leave a dewy texture to the skin similar to the behind the scenes photo. If there was some blemishes that need to be covered I would use a concealer to cover them and also apply some pink concealer under the eyes to cover any darkness necessary. To finish the base I would powder the T zone area, the outer and centre areas of the face have a dewey texture where as the forehead looks as if it has been powdered this is so that there is not a shiny reflection bouncing of the forehead when it has been photographed. 

Anna Ewers looks like she has been gently contoured. Her face has a lovely oval shape in the final campaign image. I can also see this because the contour areas look as though they have been powdered. To get this effect I would very gently contour around the cheeks and the temple areas, using a colour that is not too dark and of a slightly cool tone. The colour used does not have a bronzy warm tone. The product I would use would be Mac Shaping Powder in Light Sweep this product is great for shaping the face also this particular shade is ideal for recreating this look. 

For the eyes I would create this winged eye with a liquid eyeliner being really careful to get symmetry in the shape. On the bottom lash line I would apply just a tiny bit of eye liner using a pencil. 

When I looked at the campaign I thought a matt lipstick was definitely used however after researching and finding a photograph of make up behind the scenes the lips actually have a strong shiny texture. 

To recreate the lips I would apply a nude colour first filling in the lips. They don't looked lined completely however I may apply a little linear to the cupids bow and the middle of the bottom lip to give some shape and definition. After filling in with a nude lip I would then create the shiny texture using a lip gloss on a lip brush using it sparingly so not to create too much focus on the lips but just to give a little texture. 


The hair would be very simple after blowdrying straight I would make a middle parting and brush either side back into a bun. To get this lovely smoothed down effect I would use a matt moulding gel or cream on the hair. Fudge Shaper is a really good product to use.


Bibliography 
http://ftape.com/media/?s=Steven+Klein
Vogue November 2014 


Friday 5 December 2014

Black Opium YSL Campaign

November issue Vogue


Today I sat and had a flick through the Novemeber issue of Vogue as always it was full of stunning editorial campaigns but one of my favourites was for the new fragrance from YSL called Black Opium. I love the look for the campaign both the hair and make up. 

British model Eddie Campbell stars in the campaign and I think she's perfect for the role. She sports a mopey choppy hair style that seems to be really on trend at the moment. It takes me back to Marc Jacobs AW14 when models wore a choppy spritzed wig with a front fringe. Perhaps this trend is really catching on! 

It looks as though her hair has been teased frivolously with plenty of product this matches the naughtiness of the fragrance. A number of products could be used to achieve this look for one moulding gel on the tip of the fingers would provide an excellent stick to tease the hair into a wild direction. As well as this just a simple spray of water around the hair whilst teasing with a comb or fingers can provide this type of lovely texture that adds a look as if you've just ran home through light rain. Hair spray would be perfect to finish the look and to gain some of this big and bold volume through the hair especially through the roots of the hair.

As for the make up I was really intrigued by the look they went for. YSL stated that this campaign is targeted at younger people, The look of the hair and make up are undoubtedly aimed at a younger audience I think this look appeals to your inner wild side, the make up and hair gives off a kind of 'just rolled out of bed' look after a night out. In fact in the advert Eddie Campbell does just that and rolls out of bed in the middle of the night running through Shanghai trying to get her fix of the scent.

Ive had difficulty identifying the exact make up used on set however I will list a few that I think would be perfect to recreate this look. I will relate it to make up from YSL as this was most likely what was used. 

To begin I would use a illuminating or radiance primer because the look does have some dewiness to the face apart from around the centre of the face which can be toned down using powder. For foundation YSL have a range however the one that I think would be most suitable is Perfect Touch Foundation this is a silky smooth foundation and give hydrating sheer coverage, it does have illuminating qualities which I feel the campaign does portray on some areas of the face. Again I would tone does some of the brightness using a HD powder before applying the blush. The brows I would fill in with YSL eye brow pallet giving a nice thickness and filling in quite fully to frame the face. 

The eyes are very sultry with a dark smokey feel on the bottom lash line. Ysl have a Eye Pencil that works soft like a crayon, I would apply this to the bottom lash line doing one eye at a time because the product is water proof and may dry quickly, using a small blending brush blending this line off and dragging down slightly will give that smokey line. To enhance this I would add a small amount of eye shadow just to balance the line so that its not to harsh giving a smokey feel. I would then go back in and line the water line and the top lash line. Mascara I would use on both bottom and top lashes ever so slightly only applying just a little especially to the top lashes as not much has been used at all. The lid of the eye I would either apply just the foundation only and leave of apply a perfectly matching eye shadow that is natural just to highlight the lid slightly. Also because leaving the foundation there on its own may leave crease lines during the filming of the campaign. 

The cheeks have been highlighted quite strongly using a pink blush YSL have a product called Kiss and Blush which is a gel blush that can be used on the lips and the cheeks the colour I would choose is Pink Hedonist which is available when you follow the link. This gives a really nice matte lips and is very build able. I would apply this to the contour areas of the cheek probably using my fingers by patting it on and then powdering afterwards minimally so that there is no shine. 
The lips I would apply a YSL's lipstick in Rose Bergamasque I would apply this subtly using a lip brush, I wouldn't use a lip liner because the natural shape of the lip is obvious. I would apply the colour very subtly.


Bibliography 
http://www.yslbeauty.co.uk/makeup/lips/lipsticks
November Issue Vogue 2014 

Zac Possen New York SS15


The make up for Zac Possen was a clean fresh dewey look full of texture, A range of different make up from Mac was used to create the perfect mix of matt,shine and bold colour lead by lead stylist Kabuki. 

The clothing says to me sexy strong and independent working women, I think the make up purposely matches this statement. A fresh healthy glowing face really is enhanced and stepped up a gear with a bold and graphic red lip. 

Kabuki used two foundations on the face, starting with Face & Body on the sides of the face and a Matte Match Master foundation down the centre. This is a great idea as I feel it helps create healthy cheeks that are plump and fresh but avoids creating that shine around the T zone areas. 

The eyes are carefully highlighted with what looks like a subtle warm gold tone with a really shiny texture. This highlights  the health bright glow that comes with the look created by Kabuki. Lashes were coated minimally with black I think this is a nice touch because and incorporates the black that is in the collection. 

The lips are the statement making part of the look. The lips were filled in entirely and lined with Mac cherry red pencil, Then over the top a red lipstick was applied. For Kabuki this was a 'play of texture' I think applying the two colours on top of each other gives a boldness and depth of colour that finish of the look really well. 


Hair was styled by Odile Gilbert using Kèratase. I love this style it reminds me of that typical scene of a beautiful women bursting out of the water. Lots and lots of gel has been used to create this wonderful wet look texture, It has been combed back but not made flat there is still some volume in the front. This style is really masculine which I feel suit the attitude of the clothing. I think this may be one of my favourite hair styles of the season because its strong and bold and really fun for spring time. 


Take a look at the video to see a peak at the runnings of the show in hair and make up backstage. 


Bibliography 
Photographs: http://www.elle.com.au/runway/ready-to-wear/ss15/2014/9/zac-posen-ss15/zac-posen-ss15-image-4/
http://www.kpfusion.com/2014/09/18/video-graphic-makeup-at-zac-posen-ss-15-show/
Video - http://exposurenew.lookbookspro.com/blog/odile-gilbert-for-zac-posen-2

Thursday 4 December 2014

Marc Jacobs AW14

Catwalk AW14 
Catwalk AW14


Lead Artist - Francois Nars 

Products used 
- Nars Luminous Moisture Cream 
- Pure Radient Tinted Moisturiser
- Nars Radient Creamy Concealer 
- Loose Powder 

- Zen / Douceur /Sex Appeal Blush

- Andromeda Duel Intensity Eye Shadow 
- Pandora Duo Eye Shadow 
- Kalahari Duo Eye Shadow 
- Sophia single Eye Shadow

- Striptease Lip Gloss
- Eve Duo Eye Shadow


I think drama is a good word to describe Marc Jacobs shows. It seems he loves to send the models out and make them shock and surprise all fashion lovers. He loves to make a statement and he did just that with his AW14 campaign sending mannequin like models marching out with uniform bleached eye brows and a heavily powdered face. 


Francois Nars was the stylist for the show, it seems he works really closely with Marc Jacobs having also designed for previous shows and the recent SS15 when he again shocked viewers with completely bare faced glowing models. 

The shocking nature of this look is what to expect from Marc Jacobs, I like that there is a real routine in the entire look amongst all the models which give the effect of mannequins with and almost military style which seems to be a recurring theme for Marc Jacobs. 
Adding the darker shadow creates a strong crease line and really gives some depth to the eyes especially agains such a porcelain bright eye lid. The face is heavily powdered, Nars said this was to give a matte finish inspired by the clothing.1 I think this works well the clothing is very strong and has some lovely matte materials there is also no gentleness amongst the collection. Because of this I do think it would be wrong to go for an illuminating dewiness feel to the make up. It would be opposite to the attitude of the clothing. 

As for the bleached eye brows I think this really creates drama and brings shock but also I feel they blend well with the entire look. It was all very one toned and when looking at photographs of the run way the barely there eyebrows put more focus on what the model is wearing. When looking at close ups however they really are the focal point of the make up.

I love how Nars has layerd on the different blushers to give the face some structure and shape this works well in incorporating some routine to everyones face shape. It also adds some depth and a tad of colour also. This is probably the warmest part of the make up. 

For the lips Nars applied striptease lip gloss and then layered the metallic eye shadow over the top. This is the only moisture allowed to be on show on the face which I think does give the look some balance. The models faces are serious and I think metallic is probably the best texture to suit seriousness of the look. 


Much like SS15 from Marc Jacobs the girls hair was wrapped underneath a regimental straight cut wig. This for me is what makes the mannequin look come to a reality. The head band not only goes with the kind of 60s vibe but it also hides the front of the wig really well. The colours of the hair are in tune and tone with the entire collection. The texture is perfectly matt too mirroring the make up. This hair despite having a 60s vibe is also really futuristic and modern. Its very militant and strong. 


Bibliography
http://www.vogue.co.uk/brand/marc-jacobshttp://www.dazeddigital.com/fashion/article/18850/1/marc-jacobs-aw14
http://www.stylist.co.uk/fashion-week/fashion-week-bloggers/new-york-fashion-week

The Legendary Hair Stylist that is Christiaan


The Dutch Christiaan Houtenbos is one of the most legendary hair stylists contributing to some of most talked about trends over the decades. He is credited for inventing the 'undercut'1 I have followed him for some time and I feel he is a really inspirational stylist that should be talked about. 

Born 1945 Christiaan started early as a barber at the age of just twelve. Going on to study hair dressing in Amsterdam at a womens beauty school.2 Since then he has contributed a great deal to hair culture. 

By the age of 20 christiaan was invited by Glamour Magazine to New york due to a recommendation from one of his first clients in his home country.3 Soon after Christiaan gained enormous popularity working in a New York Salon and then eventually going on shoots, TV appearances working for actresses and models.4

Christiaan has had many defining moments contributing endlessly to Vogue, Glamour, Calvin Klien. He has styled for big names such as Lady Gaga, Kate Moss, Grace Jones, Victoria Beckham and a huge amount more. 


Grace Jones Signature cut by Christiaan 
Daria Werbowy hair by Christiaan


His most famous Undercut 

Christiaan is quite possibly one of my favourite hair stylist, He embraces all hair types having himself had many cuts including dread locks. He's never afraid to try anything different despite the fact that it may shock people especially considering he started his hair adventure at a time were conservative styles were the norm. He is able to create weird and wonderful styles and could probably free cut with his eyes closed! I aspire to have some of the confidence he possesses when it comes to hair styling. As well as the creativity!


Bibliography