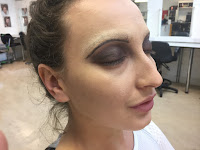
Today I went to West Thames with my model to use the studios to develop and practice final make up ideas. The focus was to finalise make up techniques such as which way to block out the eyebrows which is key to my development. I also wanted to finalise the correct colours to use on both eyes and lips.
Blocking out the eye brows - Development
I first started by using soap to block out the eye brows. This is a method I have not used before and was not planned because I had been intending to use Prosaid from college dispensary but was told It was no longer available.
The soap did a great job at flattening the eye brows so that they lay as close to the skin as possible. To get this effect I dipped only half of a disposable mascara wand in a water.
I then rubbed the mascara wand a long the soap to achieve a waxy and sticky texture. This was an important step as if the soap or mascara wand was too wet it is almost impossible to stick the eye brow hairs down.
Although the soap stuck the eye brow hairs down well it failed to remain entirely flat as I began to conceal the eye brows using my Kryolan Dermacolour camouflage palette. Despite using powder in between each
stage to mattify and hold the coverage there was still some slight lifting and movement of my models eye brow hairs. This made them start to become visible again, I quickly decided this was not a suitable method to use for my final piece particularly as they are going to photographed which will highlight any poor coverage.
As I moved on with drawing on the eye brows I made a second mistake by positioning them far to low.
Because the soap did a poor job at keeping the eye brows flat as I started to draw over the eye brows they moved
so for this reason I drew below them and this created a very unflattering eye brow that made the eyes smaller and made the fore head larger. I new this was wrong however I continued to draw them both on as I wanted to practice creating a 1920s shape. I also used this opportunity to decide on the right product to use for creating the eye brows.
 The two products I used to practice was first Anastasia Dip Brow in Ebony and Mac Brow crayons in stylised which was the darkest available to me.
 I used a brow brush to apply the Dip brow pomade and this was no good at all. Because I had layered on camouflage product it moved as I applied the pomade and turned a greyish colour as It mixed with the base. This happened even though I had used plenty of powder between each layer.
I then drew on the brow using the mac brow crayon which was great to use. It was dryer in texture and did not drag any existing product on the skin. I also found it easier to create a neater shape in a shorter amount of time holding the pencil rather then using a eye brow brush which required more back and forth movement in the hands.
At this point I needed to develop the techniques to be used to block out the eyebrows and needed to improve on my placing of the brows. Although at this stage I had finalised a correct eye brow product to use and suitable camouflage colours for my model.
My model has a very yellow undertone and so conceal the brows I used the most yellow camouflage colour mixed with a little D32 to create a good coverage.
 The second stage of my development was far more successful. I used Pritt stick to flatten the eye brows which worked really well and kept the eye brows flattened to the skin for the entire time working on them. Pritt stick was far more resistant then soap.This made it far easier to draw over the top once I had concealed. I realised at this point that I could in fact use spirit gum. Before practicing I did not realise this was an option. Unfortunately I had left my spirit gum at home and so was unable to practice with it however I know it has similar effects if not better then Pritt Stick.
Eye Make up
As I had spent lots of time researching and reminding myself on 1920s make up I had a clear image in my mind of the type of make up I wanted to create. I intended on creating a very classic and vampy 1920s look that would show the glam side of 1920s make up side.
I came across this beautiful image of 1920s flapper girl Anita Page in my research and decided to use it as a main point of reference during developing my make up.
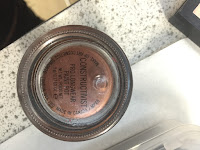
I started the eye makeup by creating a base using Mac Paint pot in constructivist. I wanted to create a base as the look I was planning was very vampy and using a cream base is a really quick way to create intense colour when the eye shadow is applied on top. I also find that a cream eye shadow makes less mess when applying in comparison to lots of eye shadow which would have been needed with out the base.
 Together these colours created really quite a good representation of 1920s vamp colours. With reference to period hair and make up in year one 1920s vamp make up looks would have been created with 'black, brown and purple grey tones'. This combination of colours created a perfect hue of smokey vamp. The Ben Nye colour I used on top in violet does not have great colour intensity and worked well to take out the metallic in the paint pot and give the colour a more coal like feel.
 I worked on blending the colours right up towards the begging of the brow as this is where the focus of the shadow used to be to create a downwards shape on the eye.
I blended the colour on the bottom lash line leaving the waterline free of shadow as this was a popular technique in the 1920s. I used a skin tone eye liner in the water line to brighten the eyes. From Charlotte Tilbury.
Points to improve
Moving forward I need to spend more time blending the edges, I feel I also need to create a more downwards shape on the outer corners of the eye to give the make up a more 1920s feel.
The colours worked really well and looked very 1920s.
I feel the eye brows need to also be given more of a slant. The shape looks very period but could be seen as 30s or later. If I give them more of an umbrella shape going forward this will give it the desired effect.
Lips and Base
My model has recently come back from a holiday so this meant I needed to pail down the skin and the neck to make to bring the look into the right period. I used a mixture of Illamasqua and Face and Body from mac. The illamsqua base was very peachy pink which was a great colour for the era however my models skin tone was very yellow so I mixed a little face and body with a slightly yellow under tone to bring the colour up slightly so that it sat well.
 For the lips I used a combination of Charlotte Tilbury products to create a deep dark rose colour on the lips that I felt was perfect for a 1920s vamp make up.
I used a lip liner to create a very bow lip shape filling in with lipstick and a little gloss. I used foundation to block out the corner of the lips so they had more of a pursed bow look.
I feel I can improve on the lip shape by making the top more rounded.


No comments:
Post a Comment